
When a subscriber clicks Cancel subscription in the customer portal, Revenue Shield shows your cancel flow first. They tell you why they're leaving and can take an alternative, such as a pause, a skipped order or a discount. Cancel anyway is on every step, so no one is kept from cancelling. Two pages work together:
- Cancel flow is the ordered steps every customer sees.
- Save offers tests offers against each other and shows which one customers accept most.
Setup takes about 10 minutes.
Who it's for: every subscription store. The cancel flow and save offers are part of Revenue Shield, included in the Basic and Pro plans.
Step 1: Open the cancel tools
- In your Shopify admin, open Apps → RecurX Subscriptions and click Retention in the sidebar.
- Click the Cancellation flows tab.
- Click Manage on Cancel flow builder to edit the steps, or Manage on Save offers to run an A/B test.
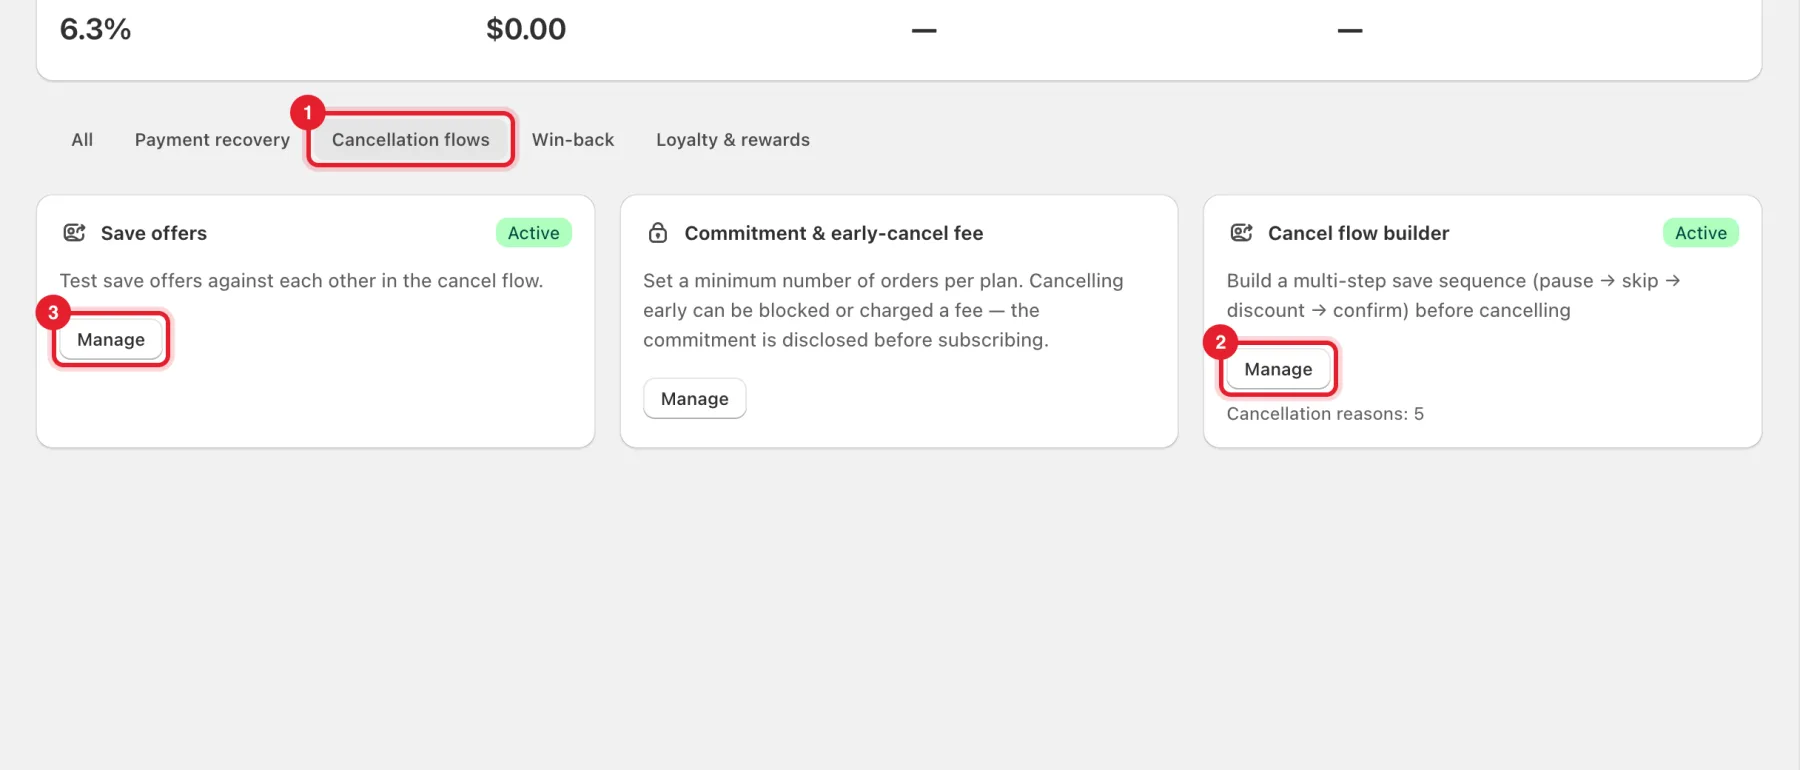
Tip: Commitment & early-cancel fee on the same tab sets a minimum number of orders per plan. See Create a subscription plan.
Step 2: Turn the cancel flow on
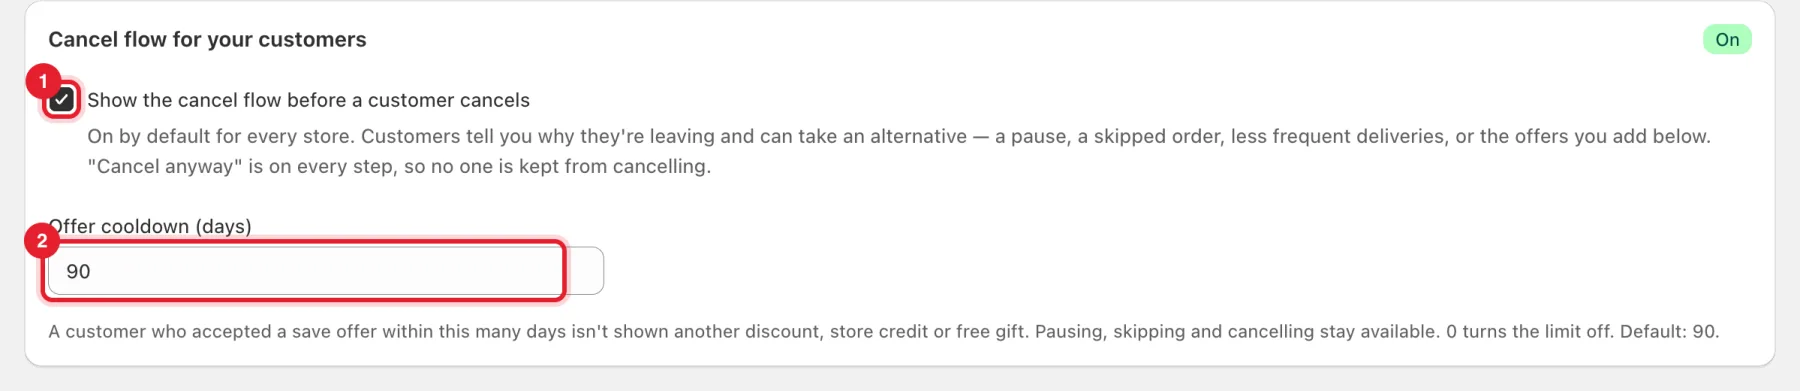
At the top of the Cancel flow page:
- Show the cancel flow before a customer cancels is on by default for every store.
- Offer cooldown (days): a customer who accepted a save offer within this many days isn't shown another discount, store credit or free gift. 0 turns the limit off. The default is 90.
Step 3: Build the save sequence
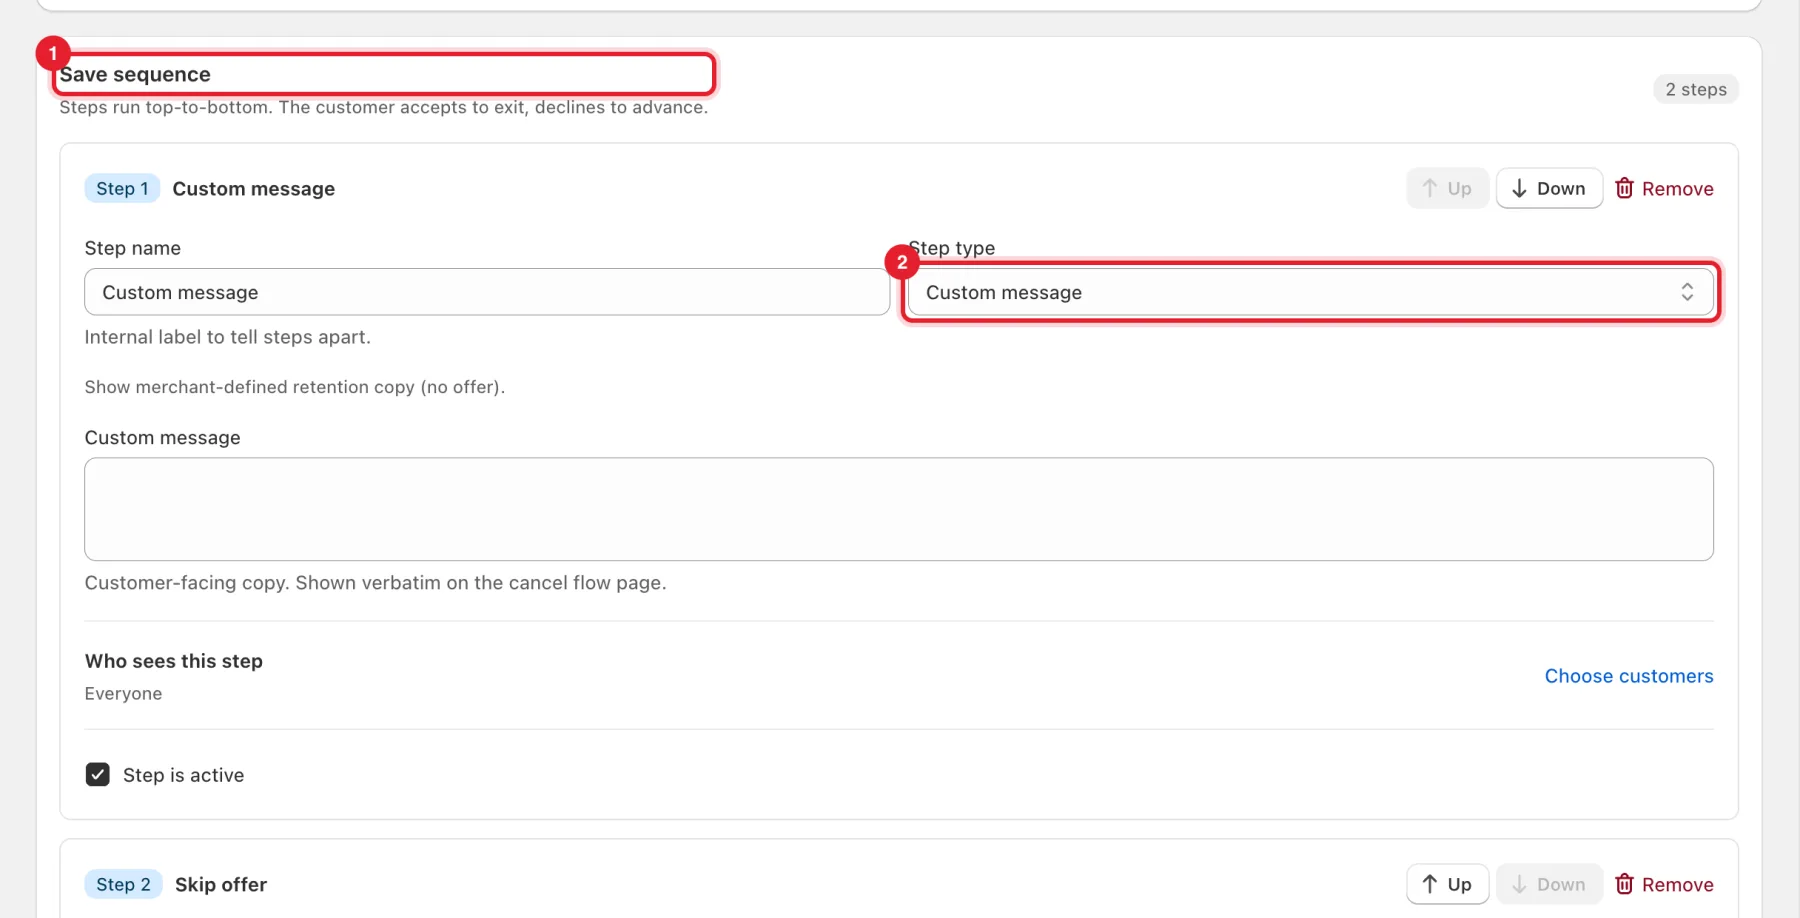
Save sequence lists the steps. They run top to bottom: the customer accepts an offer to stop, or declines to see the next step.
- Give each step a Step name.
- Choose its Step type, such as a pause, skip, discount or reason picker, and fill in the fields under it.
- Use Who sees this step, Step is active, Up, Down and Remove to target, switch off, reorder or delete steps.
For every step type, its settings and per-reason offers, see Build your cancel flow.
Step 4: Add steps and save
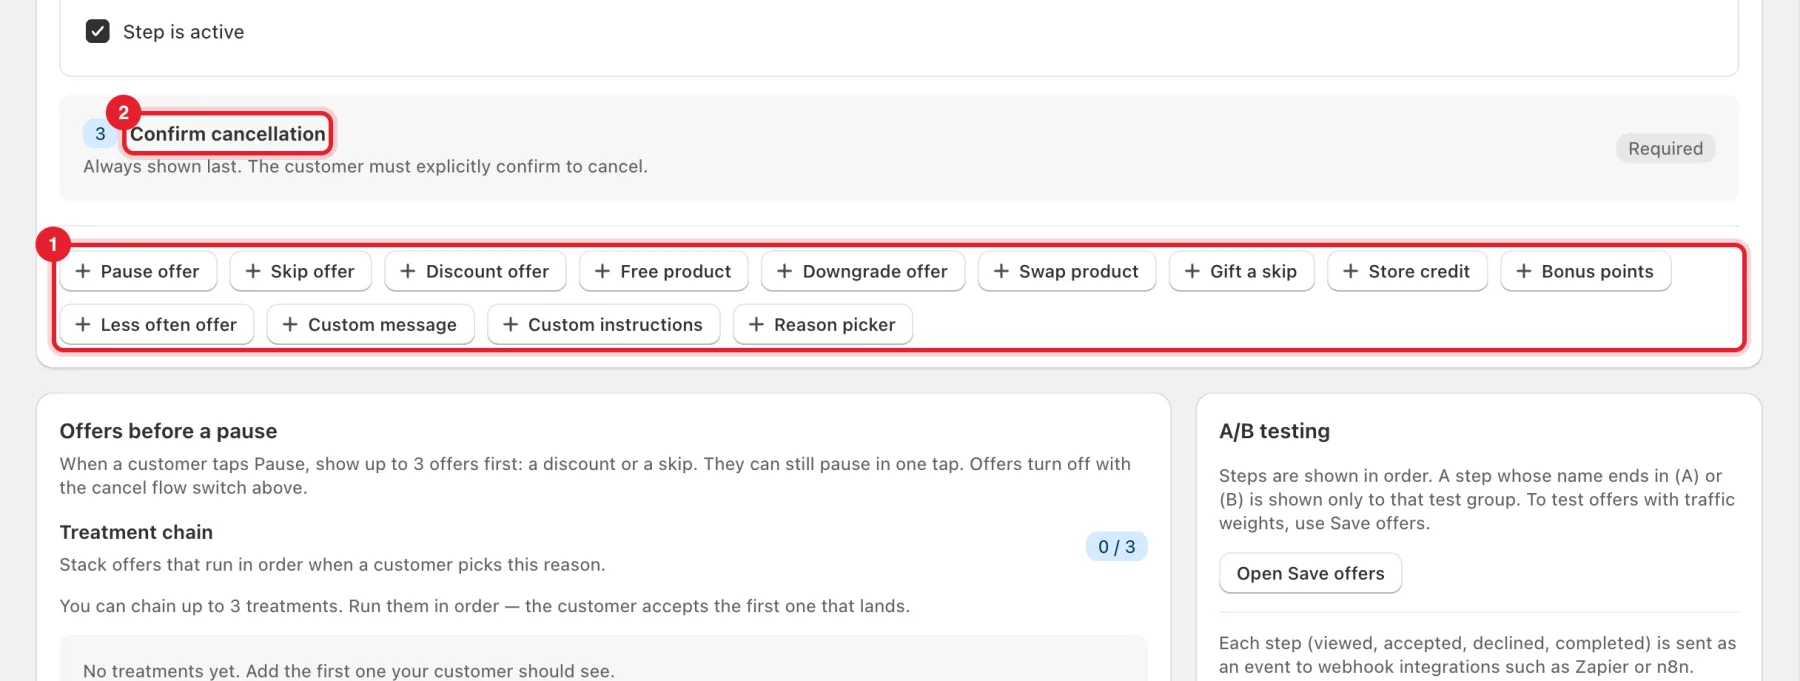
- Click a button under the steps to add one: Pause offer, Skip offer, Discount offer, Free product, Downgrade offer, Swap product, Gift a skip, Store credit, Bonus points, Less often offer, Custom message, Custom instructions or Reason picker.
- Confirm cancellation is always shown last. The customer must confirm to cancel.
- Click Save in the bar at the top of the page.
Step 5: Go to Save offers
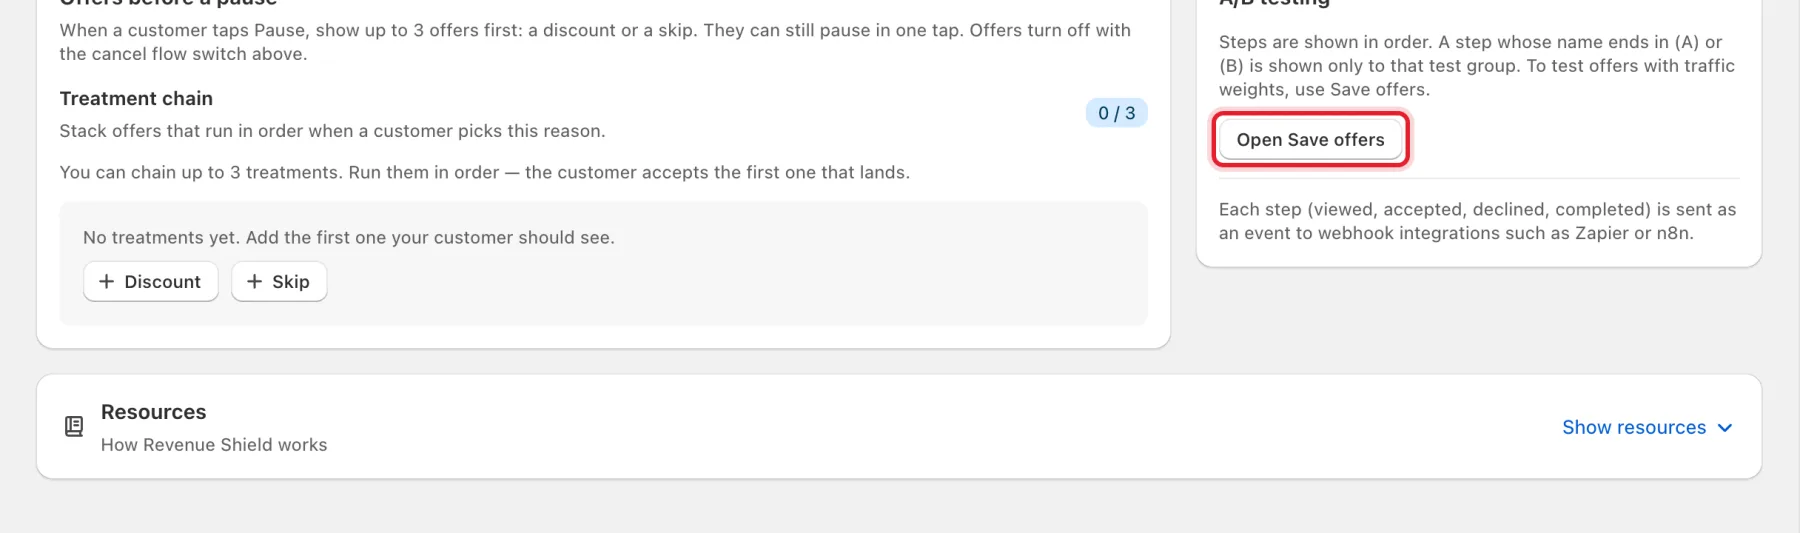
The A/B testing card on the Cancel flow page explains the simple split: a step whose name ends in (A) or (B) is shown only to that test group. To test offers with traffic weights, click Open Save offers.
Step 6: Choose how traffic is split
On the Save offers page:
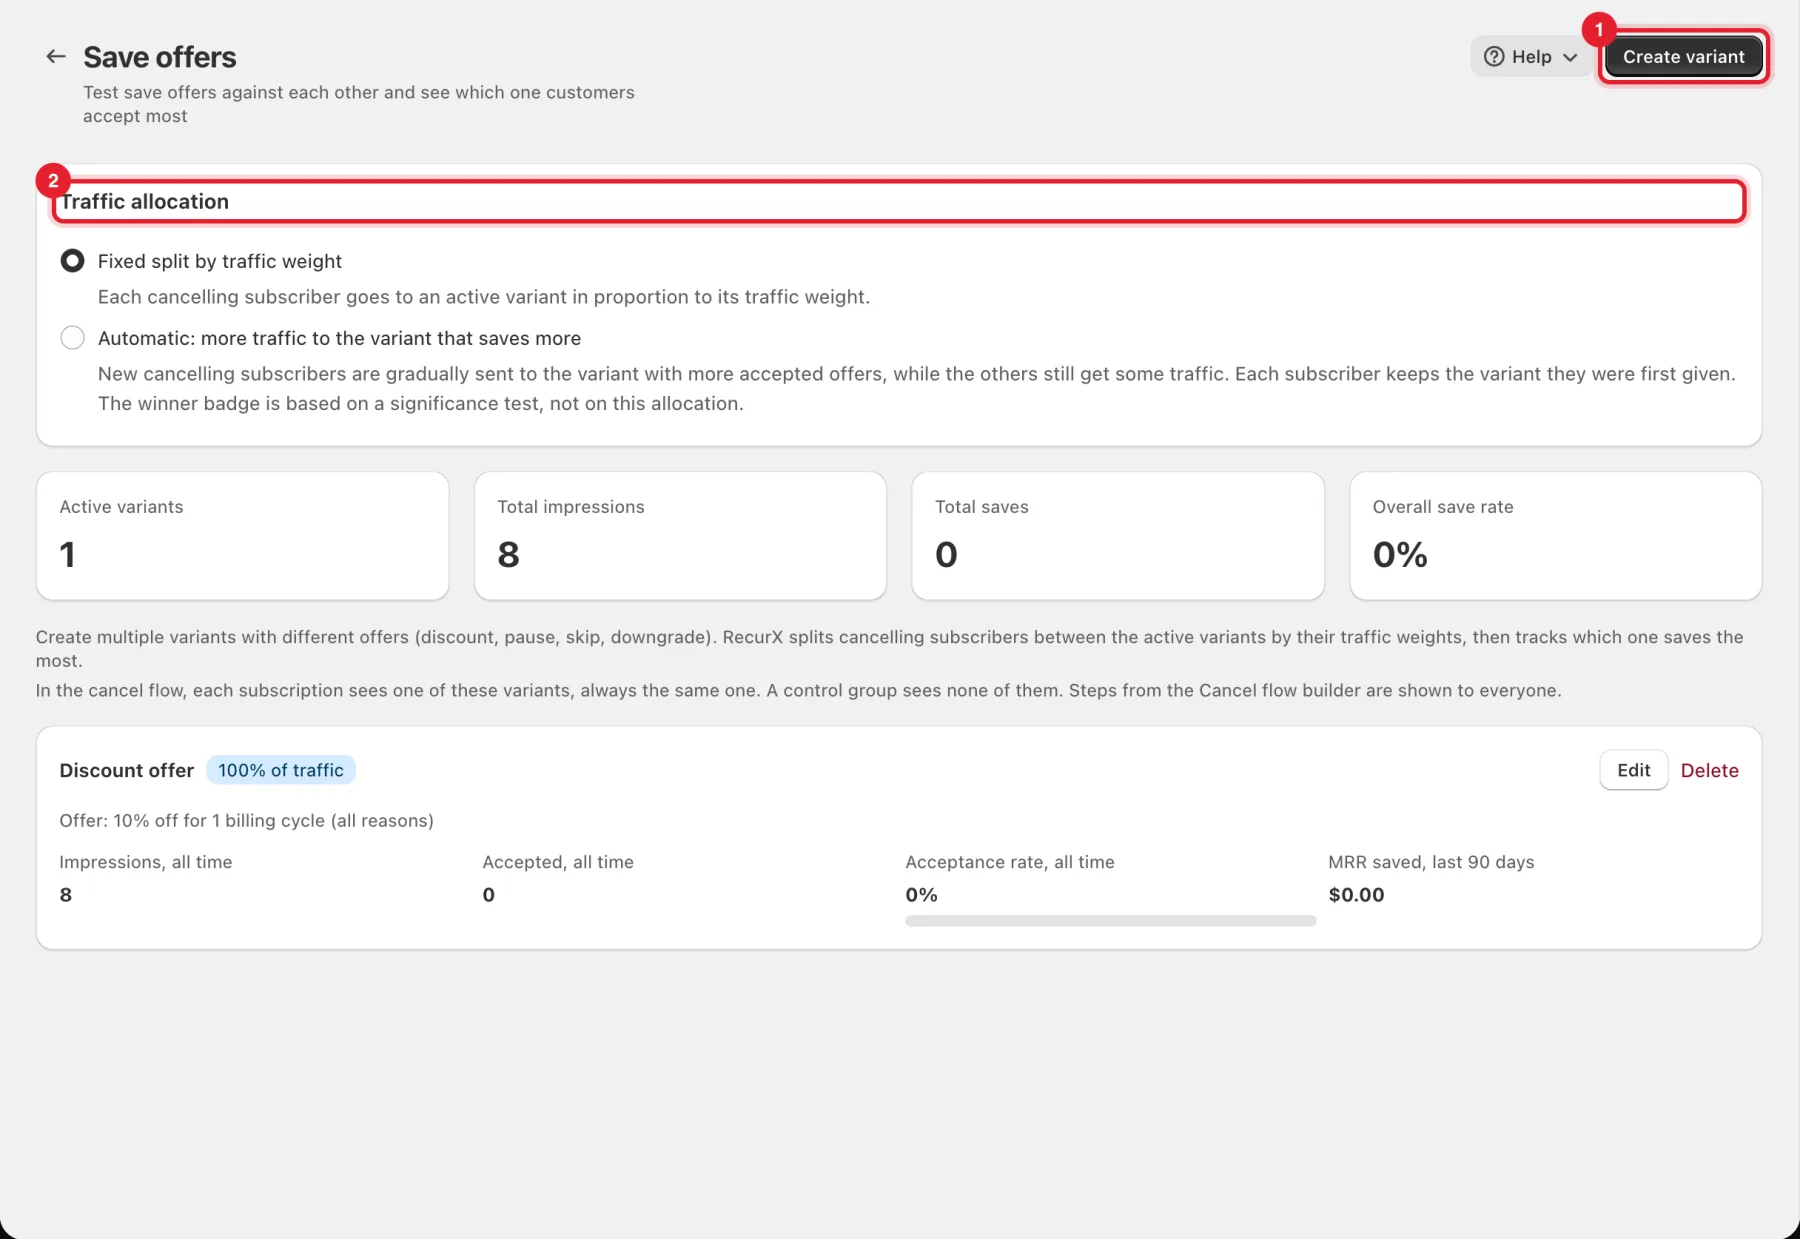
- Click Create variant to add an offer to test.
- Under Traffic allocation, choose one:
- Fixed split by traffic weight: each cancelling subscriber goes to an active variant in proportion to its traffic weight.
- Automatic: more traffic to the variant that saves more: new cancelling subscribers are gradually sent to the variant with more accepted offers, while the others still get some traffic.
Each subscriber keeps the variant they were first given.
Step 7: Create a variant
In Create A/B test variant:
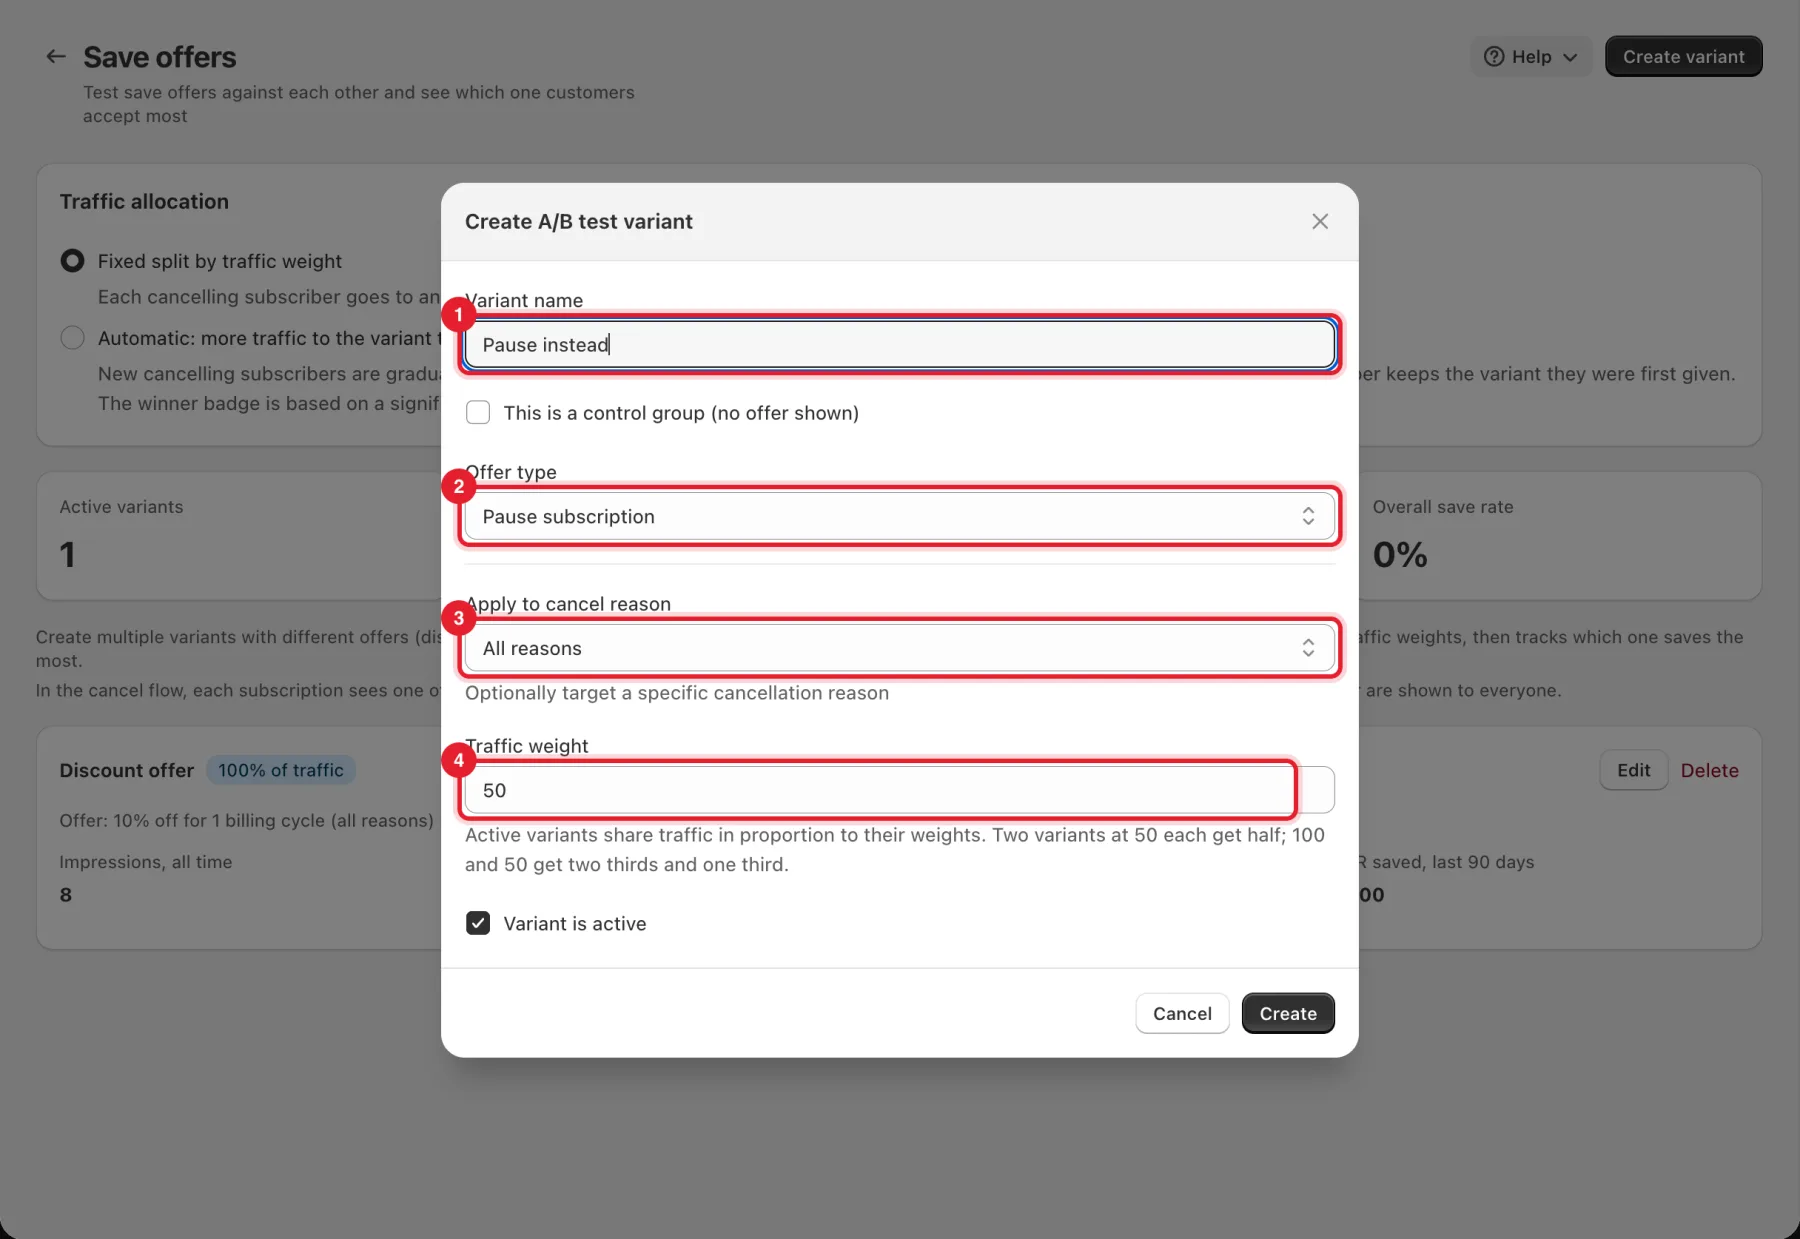
- Enter a Variant name, for example Pause instead. Tick This is a control group (no offer shown) to measure against no offer.
- Offer type: Discount, Pause subscription, Skip next delivery, Downgrade to cheaper plan, Free gift or Custom message. A discount has a Value, Type and number of Cycles.
- Apply to cancel reason: All reasons, or one reason only.
- Traffic weight: active variants share traffic in proportion to their weights. Two variants at 50 each get half. Variants at 100 and 50 get two thirds and one third.
- Keep Variant is active ticked and click Create.
Step 8: Read the results
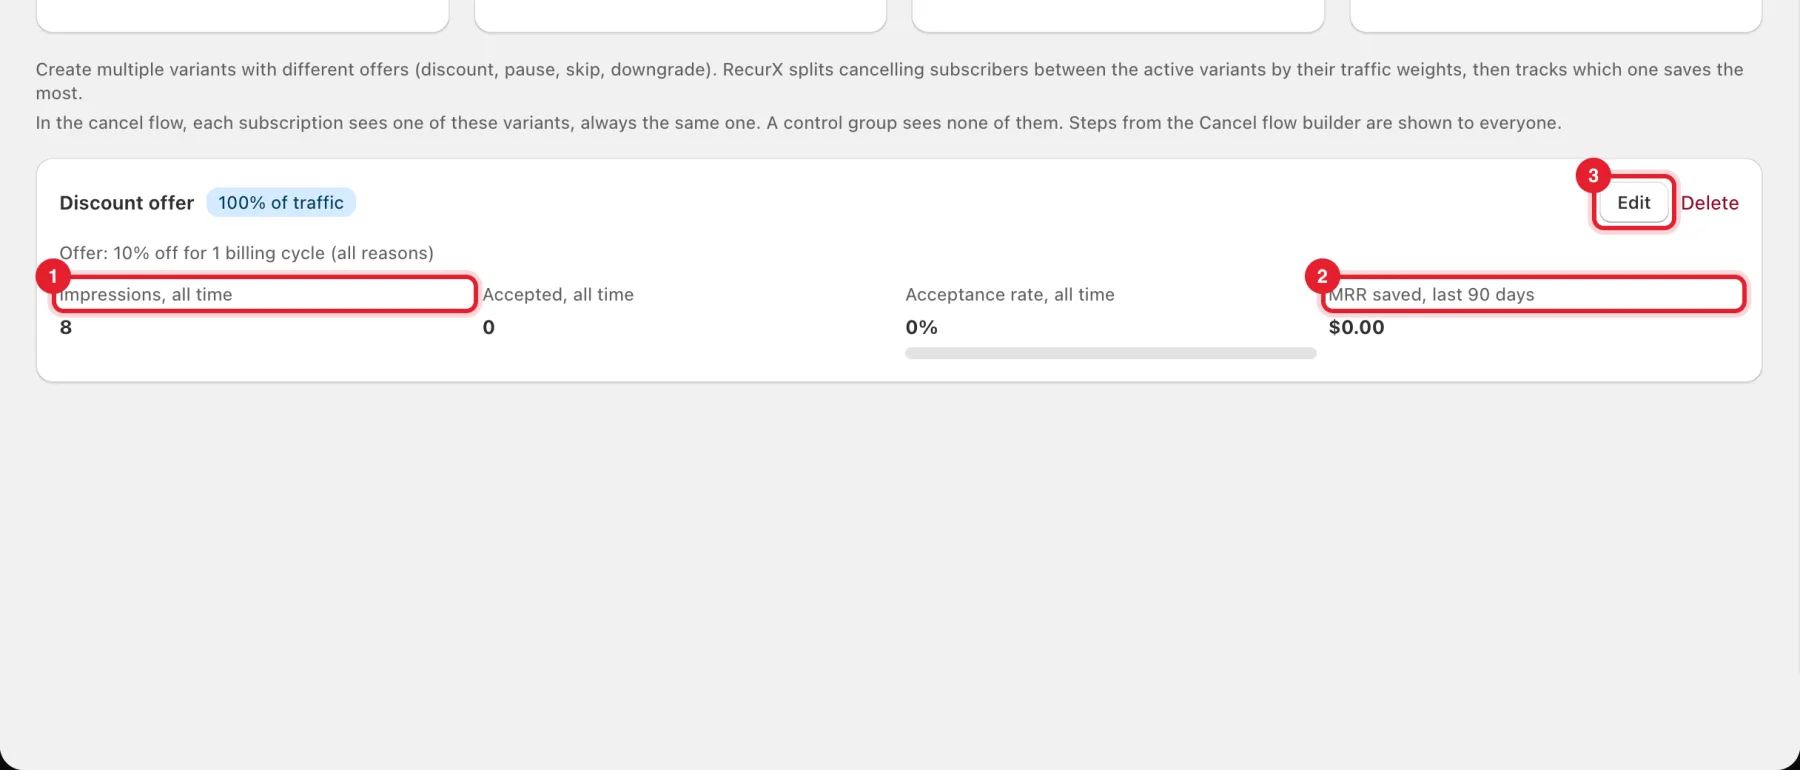
Each variant card shows:
- Impressions, all time, Accepted, all time and Acceptance rate, all time.
- MRR saved, last 90 days.
- Click Edit to change a variant or its weight, or Delete to remove it.
The totals at the top of the page show Active variants, Total impressions, Total saves and Overall save rate. The Save rate (last 30 days) card on the Retention page tracks saves across your store.
Good to know
- Can customers still cancel? Yes. Cancel anyway is on every step, and Confirm cancellation is always the last one. In regions you set under Direct cancel by region (in the customer portal settings), customers skip the flow. See What subscribers can do themselves.
- In the cancel flow, each subscription sees one variant, always the same one. A control group sees none of them. Steps from the Cancel flow page are shown to everyone.
- What about customers who already cancelled? Use Win-back campaigns.